How we made our virtual field trips
Introduction
On this page, we briefly discuss and reflect on how we made the virtual field trips produced as part of this project.
For those thinking about producing their own, some of this background may be useful. As emphasised elsewhere, however, the right approach for one project may not be the right approach for another. We endeavour to take this into account by flagging up other routes that would have yielded broadly similar outcomes.
This page provides an overview rather than specific details, which can be found elsewhere on this site.
Table of Contents
Why these locations?
The speed at which the project had to be developed effectively ruled out any substantive consultation with the wider community on virtual field trip locations and themes. We initially committed to developing two sets of resources, primarily for use as illustrative examples on this site. As it turned out, we ended up with five!
The only site we were confident about at the outset was the iconic Glen Roy in the western Grampians of Scotland, a visually impressive site already familiar to one of the project team and one we felt would attract a lot of interest. We soon realised that developing something for the adjacent Coire Ardair would be worthwhile because: (i) it offers something quite different to Glen Roy; and (ii) it would be an efficient use of resources because we would be in the area anyway.
We were also keen to develop at least one virtual field trip to a coastal environment, to provide some variety and contrast with the Scottish upland examples. Staff at the Field Studies Council (FSC) helped us to identify two suitable sites in South Devon (Slapton and Prawle Point). Again, we determined that producing two virtual field trips would be an efficient use of resources. We found we had an extra fieldwork day and so included Seatown at fairly short notice. This site, on the Jurassic Coast, is well known to many for its impressive landslides.
It is also worth noting we wanted to develop resources that would serve the community beyond their role as illustrations for virtual fieldwork development. We realised we could do this by creating them for popular field trip locations, which in turn will help at least some institutions in their wider efforts to make in-person fieldwork more inclusive. Of course, these resources can be used for teaching irrespective of whether in-person fieldwork is undertaken at these venues.
Planning: the finer details
For each venue, we produced a provisional plan of specific locations to visit and resources to collect whilst in the field. Google Earth (web) was our go-to tool because of its speed and convenience, including the ease of remote collaboration across institutions.
Producing a plan forces you to think about the academic and logistical details of what you are trying to achieve in the field. Mindful of the inclusion focus of this project, we paid just as much attention to the important ‘non-academic’ aspects of the fieldwork, such as the walk from car parks to the field sites, the nature of the paths (gradient, roughness), and the location of any facilities.
For example, the Prawle Point virtual field trip includes a walk from the village green (where the toilet facilities are located) to the beach. This walk includes a short yet steep descent across a grassy field. The Field Studies Council staff, who we liaised with in the planning stages, were keen that this was included in the virtual field trip, because it can sometimes take students by surprise (see stops 5 and 6).
When developing virtual field trips to support your own in-person field activities, you could consider capturing the accommodation (if used) and the drive to the site. For the Glen Roy virtual field trip, there are two videos that capture the drive between sites.
For producing maps to use in the field, we transferred everything into a GIS and used Ordnance Survey 1:25,000 maps as a backdrop. Of course, there are any number of other ways this process could have been completed, not least by the annotation of paper-based maps.
We would like to acknowledge the support and advice from colleagues at Royal Holloway and NatureScot in the planning of the Scottish fieldwork, and the Field Studies Council for the South Devon fieldwork.
We paid close attention to the wider field experience, such as the walk into field sites, the nature of the terrain (gradient, roughness), and the location of any facilities. These are important elements for virtual field trips designed with inclusion in mind.
Weather
One of the biggest challenges was planning fieldwork around the weather and our various commitments. For virtual field trip development, sunny conditions are generally desirable for two reasons.
Firstly, sunshine can enhance a landscape by creating shadows that accentuate some of the more subtle features.
Secondly, bright conditions usually yield better quality images, which is especially important for cameras with smaller image sensors, such as the GoPro Max.
As it happened, we used a digital SLR rather than a smaller device. This is much more forgiving in poorer light and offers greater flexibility to enhance the images following fieldwork.
The short duration of the funded element of the project meant we had less flexibility than we would have liked to work around the weather.
We completed the Scottish fieldwork in early April, travelling up from the English Midlands with the expectation of at least 3 days’ good weather. Unfortunately, the forecast good weather did not materialise, and we ended up with just 2 days of mostly cloudy conditions!
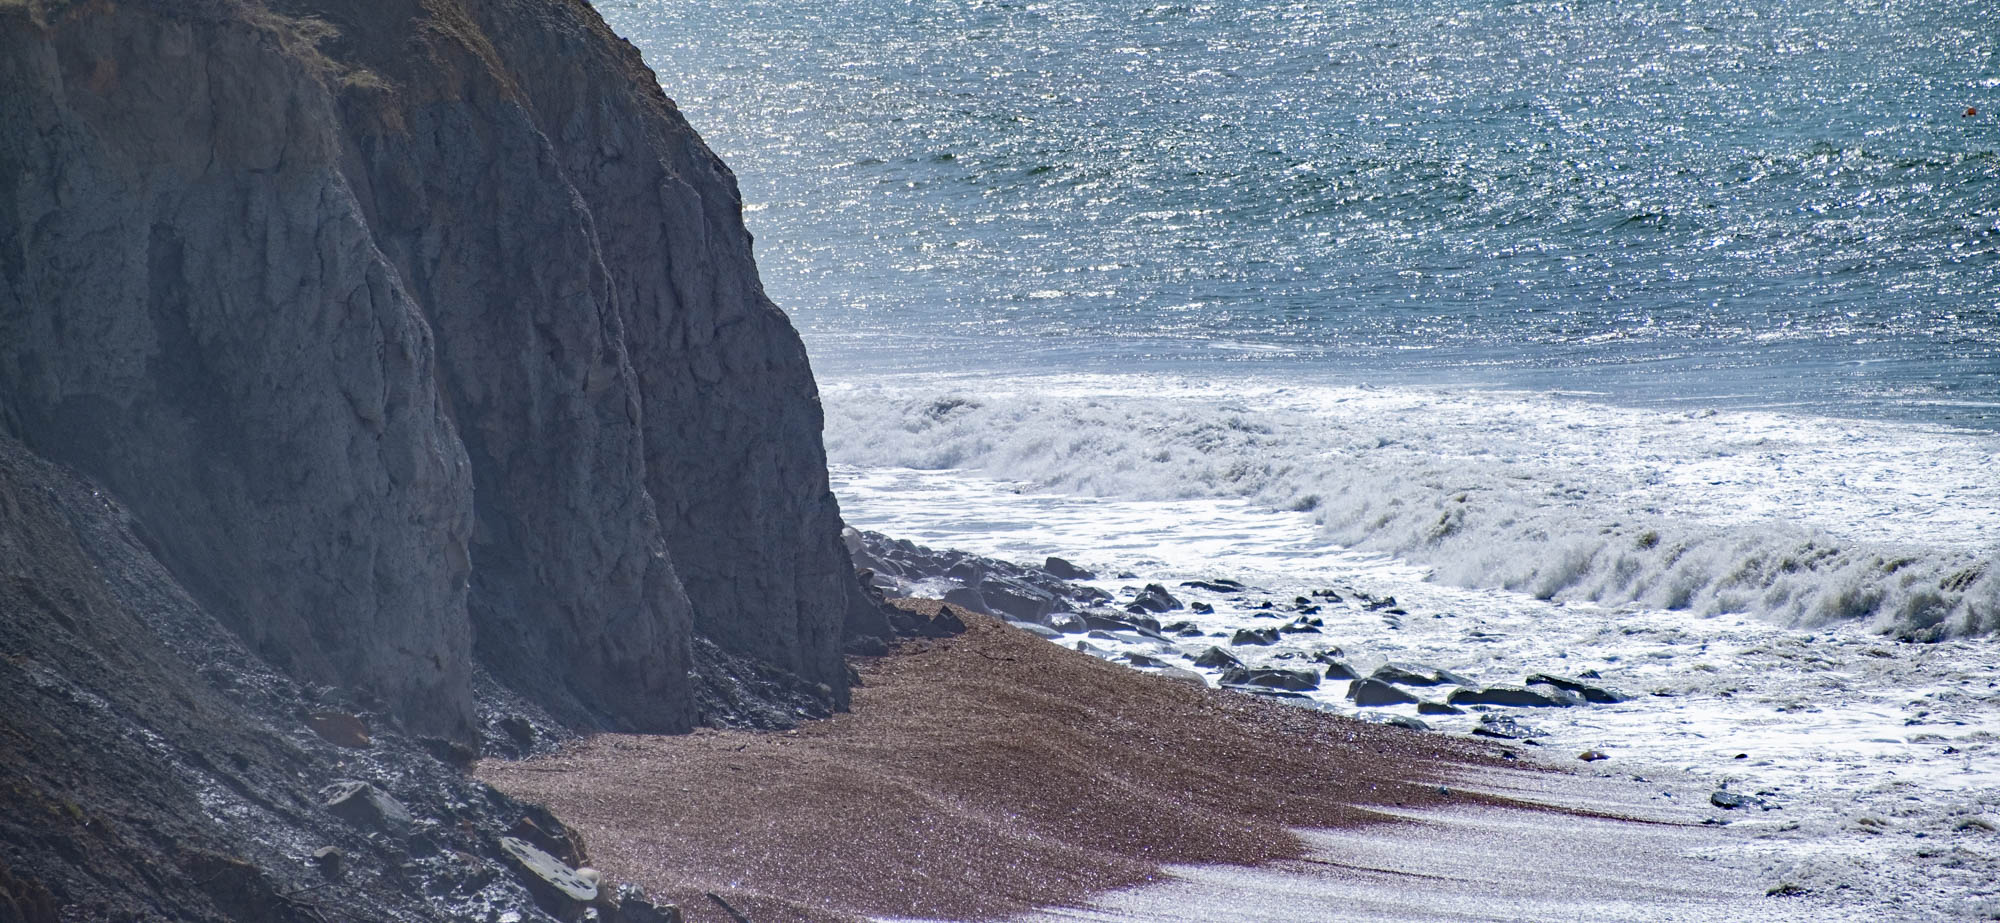
The coastal fieldwork took place in mid-May. We were holding out for better weather, and it mostly was – although you will see from the completed resources that there was a lot of cloud around. Both the Prawle and Seatown fieldwork days were cut short by rain, unfortunately.
If not for the constraints of the project timings, we would have undertaken the Scottish fieldwork in September or October, a time of year when the autumnal colours of the vegetation are often spectacular. In April 2022, however, the vegetation was only just beginning to recover from winter.
This introduces the possibility of virtual field trips that capture changes over time – seasonally or over longer periods. This is beyond the remit of the current project, however.

The weather during fieldwork in Scotland was not as good as originally forecast, with one day lost to rain and the other two days mostly cloudy – but fortunately dry. This screenshot from the Coire Ardair virtual field trip also highlights how the vegetation appeared rather ‘drab’ following winter, although ecologists may take a different view!
Good lighting is important for resource collection in the field, especially if using a smartphone or an all-in-one 360° camera. A digital SLR (or mirrorless camera) is more forgiving of challenging lighting conditions, BUT the workflow is much more involved.

What a difference some sunshine makes! This is approximately the same view as the previous photograph. The sunshine here helps accentuate the morphology of the moraines on the lower slopes. This photograph was taken in October (2021), whereas the previous one dates to April (2022). Spatial variations in vegetation (texture, colour), more obvious in the October photo, also help to highlight differences in geomorphology.
Equipment and fieldwork
For the Scottish fieldwork, we were somewhat optimistic about the amount of kit we would use. In part this was due to less time in the field than expected, although the weight of kit was also an issue – especially on steeper slopes!
What we describe below is what we ended up carrying in Glen Roy and Coire Ardair, although we also propose how this could be cut further.
For each site, we collected the following resources:
360° imagery
environmental audio (e.g., sounds of running water, birdsong)
For some sites, we also recorded short video clips. This only seemed to be of value where there was movement in the landscape (e.g., rivers, coasts).
We also took normal photographs for the coastal field trips. These supplement the detail visible in the panospheres and can be particularly valuable for more distant features. The powerful zoom lens used for these was not available for the Scottish fieldwork,
Do not forget to factor in the weight of the kit you will be using, especially on more challenging terrain. Also, more kit probably equates to more complexity – both in the field and back at the desk. For the ultimate in travelling light and ease of processing, you could get away with just using a good smartphone.

360° imagery
✺ Canon 5DSR plus 15mm lens
✺ panoramic head
✺ tripod.
A setup like this makes sense where image quality is paramount. You also need to have the time, money, and skills to make the most of it. For most people, this approach is likely over the top — especially if students are going to experience the location in person anyway.
Why not use a smartphone to capture 360° images? They often produce better quality results than dedicated all-in-one 360° cameras (e.g., GoPro Max, Ricoh Z1).
If image quality is the priority AND you have the time, knowledge, resources, and enthusiasm, there is no substitute for this type of setup (but note that this particular camera is no longer available).
The specifics of this camera and lens combination produce good equirectangular images, with just 6 horizontal shots and one straight up (zenith).
Manual camera settings and manual focus are the order of the day, to ensure consistency as you pan around. We ensured the camera saved RAW files as well as JPEG; the former provides much more headroom for editing, but this is just a personal preference.
We could have saved time in the field and in subsequent desk-based editing if we had used an all-in-one 360° device, such as a GoPro Max or a Ricoh Z1.
Although this would have resulted in reduced image resolution and image quality, it would have saved time and effort in the field and, especially, back at base, where there is just one photo per site. In turn, this provides an opportunity for more shots in the same amount of time.
An all-in-one 360° camera can also record audio, if you capture video as well as stills for each stop.
As suggested elsewhere, you can supplement GoPro Max images with standard photos and videos taken using other devices.
Another option would have been to use a smartphone, many of which can create photospheres via their camera apps. The process takes longer than using a GoPro Max (and similar), but the image quality is often superior – especially with newish smartphones. Indeed, many of the Stanford Earth virtual field trips are produced using this method.
Other than the extra time, the main downside to using smartphone cameras is that stitching errors can occur for objects close to the camera (due to parallax error). With enough practice and a steady hand, these visible errors can be reduced or even eliminated.

Environmental Audio
✺ Sony PCM-D100 recorder (with wind baffler/muffler)
We struggled to make the most of our audio recording kit. No matter how careful we were, wind noise was an issue in many recordings. Sorting, processing and exporting files was also a bit of a time sink.
The audio from our GoPro Hero10 video clips was impressive. On reflection, we should have used this to capture audio rather than carrying a dedicated, heavy audio recorder. The video footage also makes it easier to tie audio to specific field locations.
This (discontinued) model has an excellent reputation for capturing environmental audio, especially more subtle sounds. It does take some practice to use, though, and the results from the Scottish fieldwork were mixed.
The main issue was wind noise. Even with the wind baffler/muffler, and sheltering the device as much as possible, a considerable amount of wind noise was captured for some sites.
One thing we did learn is that some wind noise can be removed in software (e.g., Audacity, Audition). This is just extra work, of course.
Another observation we made is that many sites sound similar. Rather than creating and then editing audio files for each site, a smaller number of recordings can be made to create a representative sound library that can then be used in the virtual field trip.
This is less authentic, though, and potentially an issue if students must listen out for, say, variations in birdsong along a route. In most scenarios, a sound library would likely save a great deal of time.
Unless you have the time, enthusiasm, and budget to collect high-quality environmental audio, it probably makes more sense to use a smartphone or whatever video recording device you have with you.
In our case, the GoPro Hero10 produced good quality audio. From other fieldwork experiences, we have also been impressed with the audio quality from the GoPro Max – although we do not know how it would have fared in the windy conditions in Scotland.
Finally, do you even need audio for your virtual field trip? We’re not convinced it adds much value to the Glen Roy and Coire Ardair virtual field trips. It probably does for the coastal virtual field trips, although it is hardly essential.

Video
✺ GoPro Hero10 Black
✺ Camera Media Mod
✺ GoPro Hero7 Black
Most modern smartphones are capable of recording excellent quality video. If you do not wish to use a personal device, action cameras are relatively inexpensive, light, and robust.
Unless you specifically want 360° video, we would not recommend using a GoPro Max (or similar) for standard videos. Instead, a smartphone or an action camera (e.g., GoPro Hero10) will yield MUCH better quality videos.
We were really impressed with the GoPro Hero10. It is light, robust, and generates very good video and audio quality.
Its in-built stabilisation and horizon-levelling meant we could use it hand-held. Not having to attach it to a tripod (which is something else to carry) is a time saver. [We did have a tripod with us, but the panoramic head was attached to it for the duration of the fieldwork.]
We could have used a smartphone to record video, and many of the latest ones produce excellent results. However, we preferred not to use our personal devices for this.
Other options include digital SLRs and mirrorless cameras, but the downside is more to carry in the field.
For recording the drives for the Glen Roy virtual field trip, we attached a GoPro Hero7 to the front of the car. We could just as easily have used the GoPro Hero10, but we opted to use the older device – just in case!
As it happens, we were very happy with the quality of the GoPro Hero7 footage, and would happily have used this for other sites if required.
Editing files
All the files generated during fieldwork required some editing prior to the final step of creating the virtual field trip. This section provides an overview of what we did. This is intended to give you a flavour of our approach rather than a step-by-step guide.

360° imagery
✺ Lightroom
✺ PTGui
If we had used a smartphone or an all-in-one 360° camera to capture our panospheres, most of the work would be done for us. There is no stitching or complicated workflows. In our experience, images from the GoPro Max do benefit from some minor tweaks in an image editor (e.g., Photoshop, Affinity Photo).
We processed the RAW files in Lightroom and then exported them as new JPEG files.
The new JPEG files were then stitched together using PTGui to create an equirectangular image for each site.
At each site, we took six overlapping horizontal shots and one looking straight up (zenith). The resulting stitched image includes a hole in the nadir (looking straight down). We hid this using Photoshop. An easier to deal with this hole would have been to cover it with a logo or another graphic.
If we had used a GoPro Max or similar, we would have been spared most of this work. We would have had one equirectangular image per site straight out of the camera. The resolution and quality of the image would be lower, however, and this is the main reason we did not adopt this approach for this project.
The same applies if we had used a smartphone to create a photosphere. All we would need to do is download these equirectangular images and then see if they required any further editing.

Environmental audio
✺ Audition
The audio files were edited in Audition (other software is available, of course).
The Sony PCM-100 is very sensitive and can easily pick up rustling and breathing. We deleted those parts of the recording where these were evident.
At some sites, recording levels were too low, so these were boosted. This is not ideal; it is clearly better to get recording levels right in the field. However, it is worth saying that low recording levels are preferable to those at the other extreme, which creates distorted and unusable audio.
We also used Audition to reduce the impact of wind noise, which it did remarkably well.

Video
✺ Premiere Pro
Video was edited using Premiere Pro, although any other editing software would have been fine.
Not a great deal of editing was required. Minor adjustments were made to exposure, colours etc.
For the driving footage, we increased the speed of playback, apart from those times when passing through villages or negotiating sheep on the road, when playback speed reverts to real-time.
The exported files were uploaded to a video server (Vimeo, but YouTube would have been fine, too). Streaming video clips make much greater demands on servers, and they should be hosted on dedicated video streaming services.
Creating our virtual field trip
We created our virtual field trips using Pano2VR.
The process was relatively straightforward. For each virtual field trip, we imported all the equirectangular images (processed in PTGui) and then linked them together using hotspots the yellow hotspots on the virtual field trips.
We also added background audio and links to the videos hosted on Vimeo.
The virtual field trip was then output to a folder, which was then uploaded to a web server.
Pano2VR also provides the option of exporting your tour as a self-extracting file (no administrator rights required). All you need to do is find some online storage (e.g., your Google Drive) and users with the link can then download and view the virtual field trip.
Other virtual tour software is available, and all could have produced broadly similar results.
Another, less technical process would have been to use a cloud-based platform to produce our virtual field trip. For example, ThingLink is currently a popular, easy-to-use online service that allows you to create virtual tours and other online resources. There is a free tier, which provides you with a flavour of the service. As you would expect, some of the more advanced functionality requires an annual licence.
If you are just looking to store some photospheres online and you are not worried about adding any additional functionality, you may find Google Street View to be a good option. After uploading your files, you can then embed them in any webpage. You cannot add hotspots to link between sites, unfortunately.
More details on how to create virtual field trips are provided elsewhere on this site. The contents on this page are only intended to provide a high-level overview and a reflection on the approach we adopted.


This work is licensed under a Creative Commons Attribution-NonCommercial-ShareAlike 4.0 International License.