For some, virtual fieldwork development may just be a matter of buying an item of equipment (e.g., a GoPro Max) and then going out into the field and hoping for the best. Here, we discuss the all-important planning stage, which in an ideal world precedes any equipment purchases. What equipment you need depends on what you are trying to achieve, although budgets and other resources (staffing, time) are clearly important factors too.
Table of Contents
What are you trying to achieve?
What do you want the virtual field trip to look like, and how will students use it?
The assumption here is that you want to produce an immersive virtual field trip that replicates, as far as possible, the field ‘experience’. In other words, students should be able to look all around at ground level, just as they would in the field. There is also a role for drone imagery and/or flythroughs using virtual globes (e.g., Google Earth), because some features are more obvious when viewed from above. However, for the purposes of this project—preparing students for the field experience—they are viewed as valuable supplementary rather than core resources.
Whether you decide to produce a guided (information-rich) or self-guided (‘bare bones’) virtual field trip is entirely up to you, but the latter is easier and provides maximum flexibility – and is therefore recommended here.
If you are mainly concerned with providing pre-fieldwork information, and have lots of text, photographs, and maps, you may find that ArcGIS StoryMaps or a Google Earth Tour is a more effective and easier option. You also have the option of including some 360° imagery (which you may have taken yourself or sourced from elsewhere). We will return to how 360° imagery can be embedded in such platforms later, although they are not the main emphasis of this project.
Virtual field trip components
An immersive virtual field trip is based around 360° imagery, which may be obtained using photography (to create a photosphere) or video. In addition, 360° imagery can be augmented with links to high-definition photographs, videos, 3D models (e.g., from Sketchfab), and audio.
This page considers virtual field trip components and mostly steers clear of technical details – including equipment and workflows (which are instead discussed in a subsequent section).
360° imagery (photos and video)
A truly immersive virtual field trip uses 360° imagery, which allows the viewer to look all around. They may also be able to zoom into features of interest, subject to image resolution and virtual field trip technology.
Compared to a static photograph, which is a curated view and captures only part of the wider landscape, 360° imagery more closely captures the experience of standing in the field and provides the viewer with more autonomy. In turn, this provides the basis for meaningful learner activities that require students to take in the landscape as a whole and then identify and focus on particular features of interest.
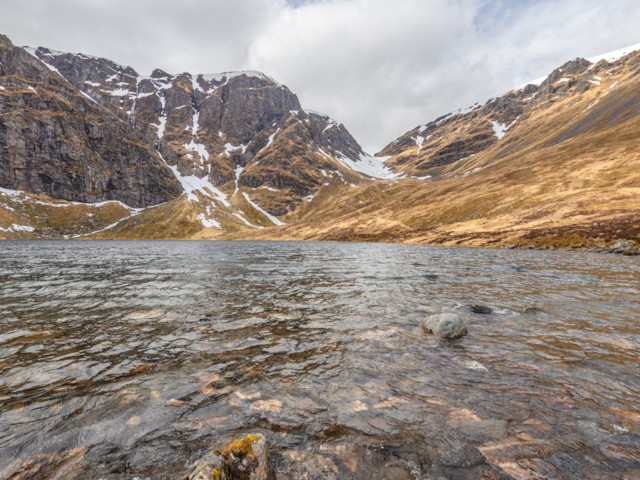
The value added by 360° imagery will vary according to the venue and topic. For example, exploring a glacier – where there are features of interest all around – will benefit more from 360° imagery than, say, a single exposure at the side of a busy road (although using it for the latter still has value in preparing students for the specifics of the field environment – which extend beyond disciplinary considerations).
This spectacular 360° photograph from Prof Tim Barrows is best viewed in fullscreen mode (click the icon on the top right-hand corner of the image).
It is hosted on Google Street View, an ideal solution if you do not want to pay for online storage. Such images can easily be embedded in your own pages. However, there is a limit to what else you can do to it. For example, adding clickable hotspots is not possible.
Compared to a static photograph, which is a curated view and captures only part of the wider landscape, 360° imagery more closely captures the experience of standing in the field and provides the viewer with more autonomy.
This is another example of a 360°, interactive image, and is best viewed in fullscreen mode. An otherwise non-immersive virtual field trip can have images like this embedded within them.
This image is not hosted on Google Street View. Instead, it is stored on the same server as this website. This provides more flexibility (e.g., to add links to text, photos, videos), although it also involves more work.
There are only a few situations where 360° video is likely to be a better option than 360° still imagery. For example, placing the camera on a small island in the middle of a stream or river, where there is flowing water all around, could work well – especially if the focus of interest is on surface flow patterns, including how these change over space and time.
Where movement occurs in a relatively small part of the frame, such as could be the case when standing on a riverbank, the disadvantages of using 360° video could start to outweigh the advantages.
The main disadvantage of 360° video is that it can generate very large files. This is certainly true for higher-end devices (e.g., Insta Pro 2), which makes such footage more difficult to edit, distribute, and view. It is much less of an issue with the files generated by lower-end devices, such as the GoPro Max, but the downside here is video quality – which is rather low for 360° viewing, and colours and details are often smudged in low light. The latter may not be apparent when viewing footage using a mobile phone or a laptop, but is readily visible on larger monitors.
For most purposes, then, 360° still imagery is the way to go in terms of quality and practicality. This can be supplemented with embedded (or separate) video clips, which will likely be much better quality than that achieved by most 360° cameras.
This 360° video of the Fagradalsfjall volcano (Iceland) was uploaded to YouTube by Arni Hrolfsson.
Unlike normal YouTube videos, you can look all around and zoom in on features. It is best viewed in fullscreen mode. You can also select the video resolution – anything up to 8K (by clicking on the cog icon on the bottom right-hand side). Not all devices and/or internet connections will cope with streaming the 8K version.
The footage was captured using a high-end camera, most likely an Insta Pro 2. Footage captured using a consumer-grade 360 camera, such as the GoPro Max, will look much worse on anything other than small screens – as shown in the example below. If used in a low light situation, such as the volcano example above, the GoPro Max would really struggle to deliver usable video quality.
Photographs and videos
It is not necessary to embed any additional content within your photosphere, but there may be situations in which this adds value. For example, ecologists may wish to include close-ups of plants, capturing detail not easily achieved via 360° imagery alone. Whatever the reason, this approach is an easy and effective way to add value to 360° imagery, especially those captured on lower-end devices.
Videos can add value where there is movement within a scene —such as flowing water or someone talking to camera—and can be embedded into 360° imagery, depending on the technology employed.
Other ways in which video can be used include capturing the journey from one location to the next. For example, a GoPro can be added to a vehicle if travel to and from a field site is also an important part of the experience (and Google Street View is not available).
This 360° image is enhanced with more detailed photographs and video clips. These additional resources compensate for the otherwise so-so quality of this GoPro Max image.
3D models
You can link to any webpage from within a photosphere, including ones hosting 3D models that can be rotated and inspected at different zoom levels. An example of a site hosting 3D models is Sketchfab, but other solutions are available.
Within a virtual field trip, 3D models can supplement what is visible in the 360° imagery. This approach can be employed at a range of scales of interest, from landscape down to individual stones. If the purpose of the virtual field trip is primarily to prepare for an in-person visit, you may decide that 3D models are not necessary because this will be done in the field anyway.
A number of geologists use ‘virtual outcrops’, which are detailed models of sites of interest. These sometimes have additional functionality, including the ability to take measurements and interrogate the data in different ways.
This Sketchfab model of the Norber erratic in Yorkshire was created by Prof Tim Barrows. When loaded (click the play button), you can examine it from any direction. It is best viewed in fullscreen mode.
Audio
Providing environmental audio can add to the immersive experience, at least where there is something to hear. The sounds of bedload being moved by a mountain stream, birdsong in a forest, and lava degassing are examples of environmental audio that could add real value to a photosphere. 360° videos will capture this audio, although not necessarily with the level of detail you require. For (still) photospheres, audio can be recorded using a mobile phone or, better still, a dedicated recorder. We will return to technical considerations in a later section.